User’s Manual
2025/05 (v2.7)
Dashcam DrivePro 250
1. Package Contents
The DrivePro dashcam package includes the following items:
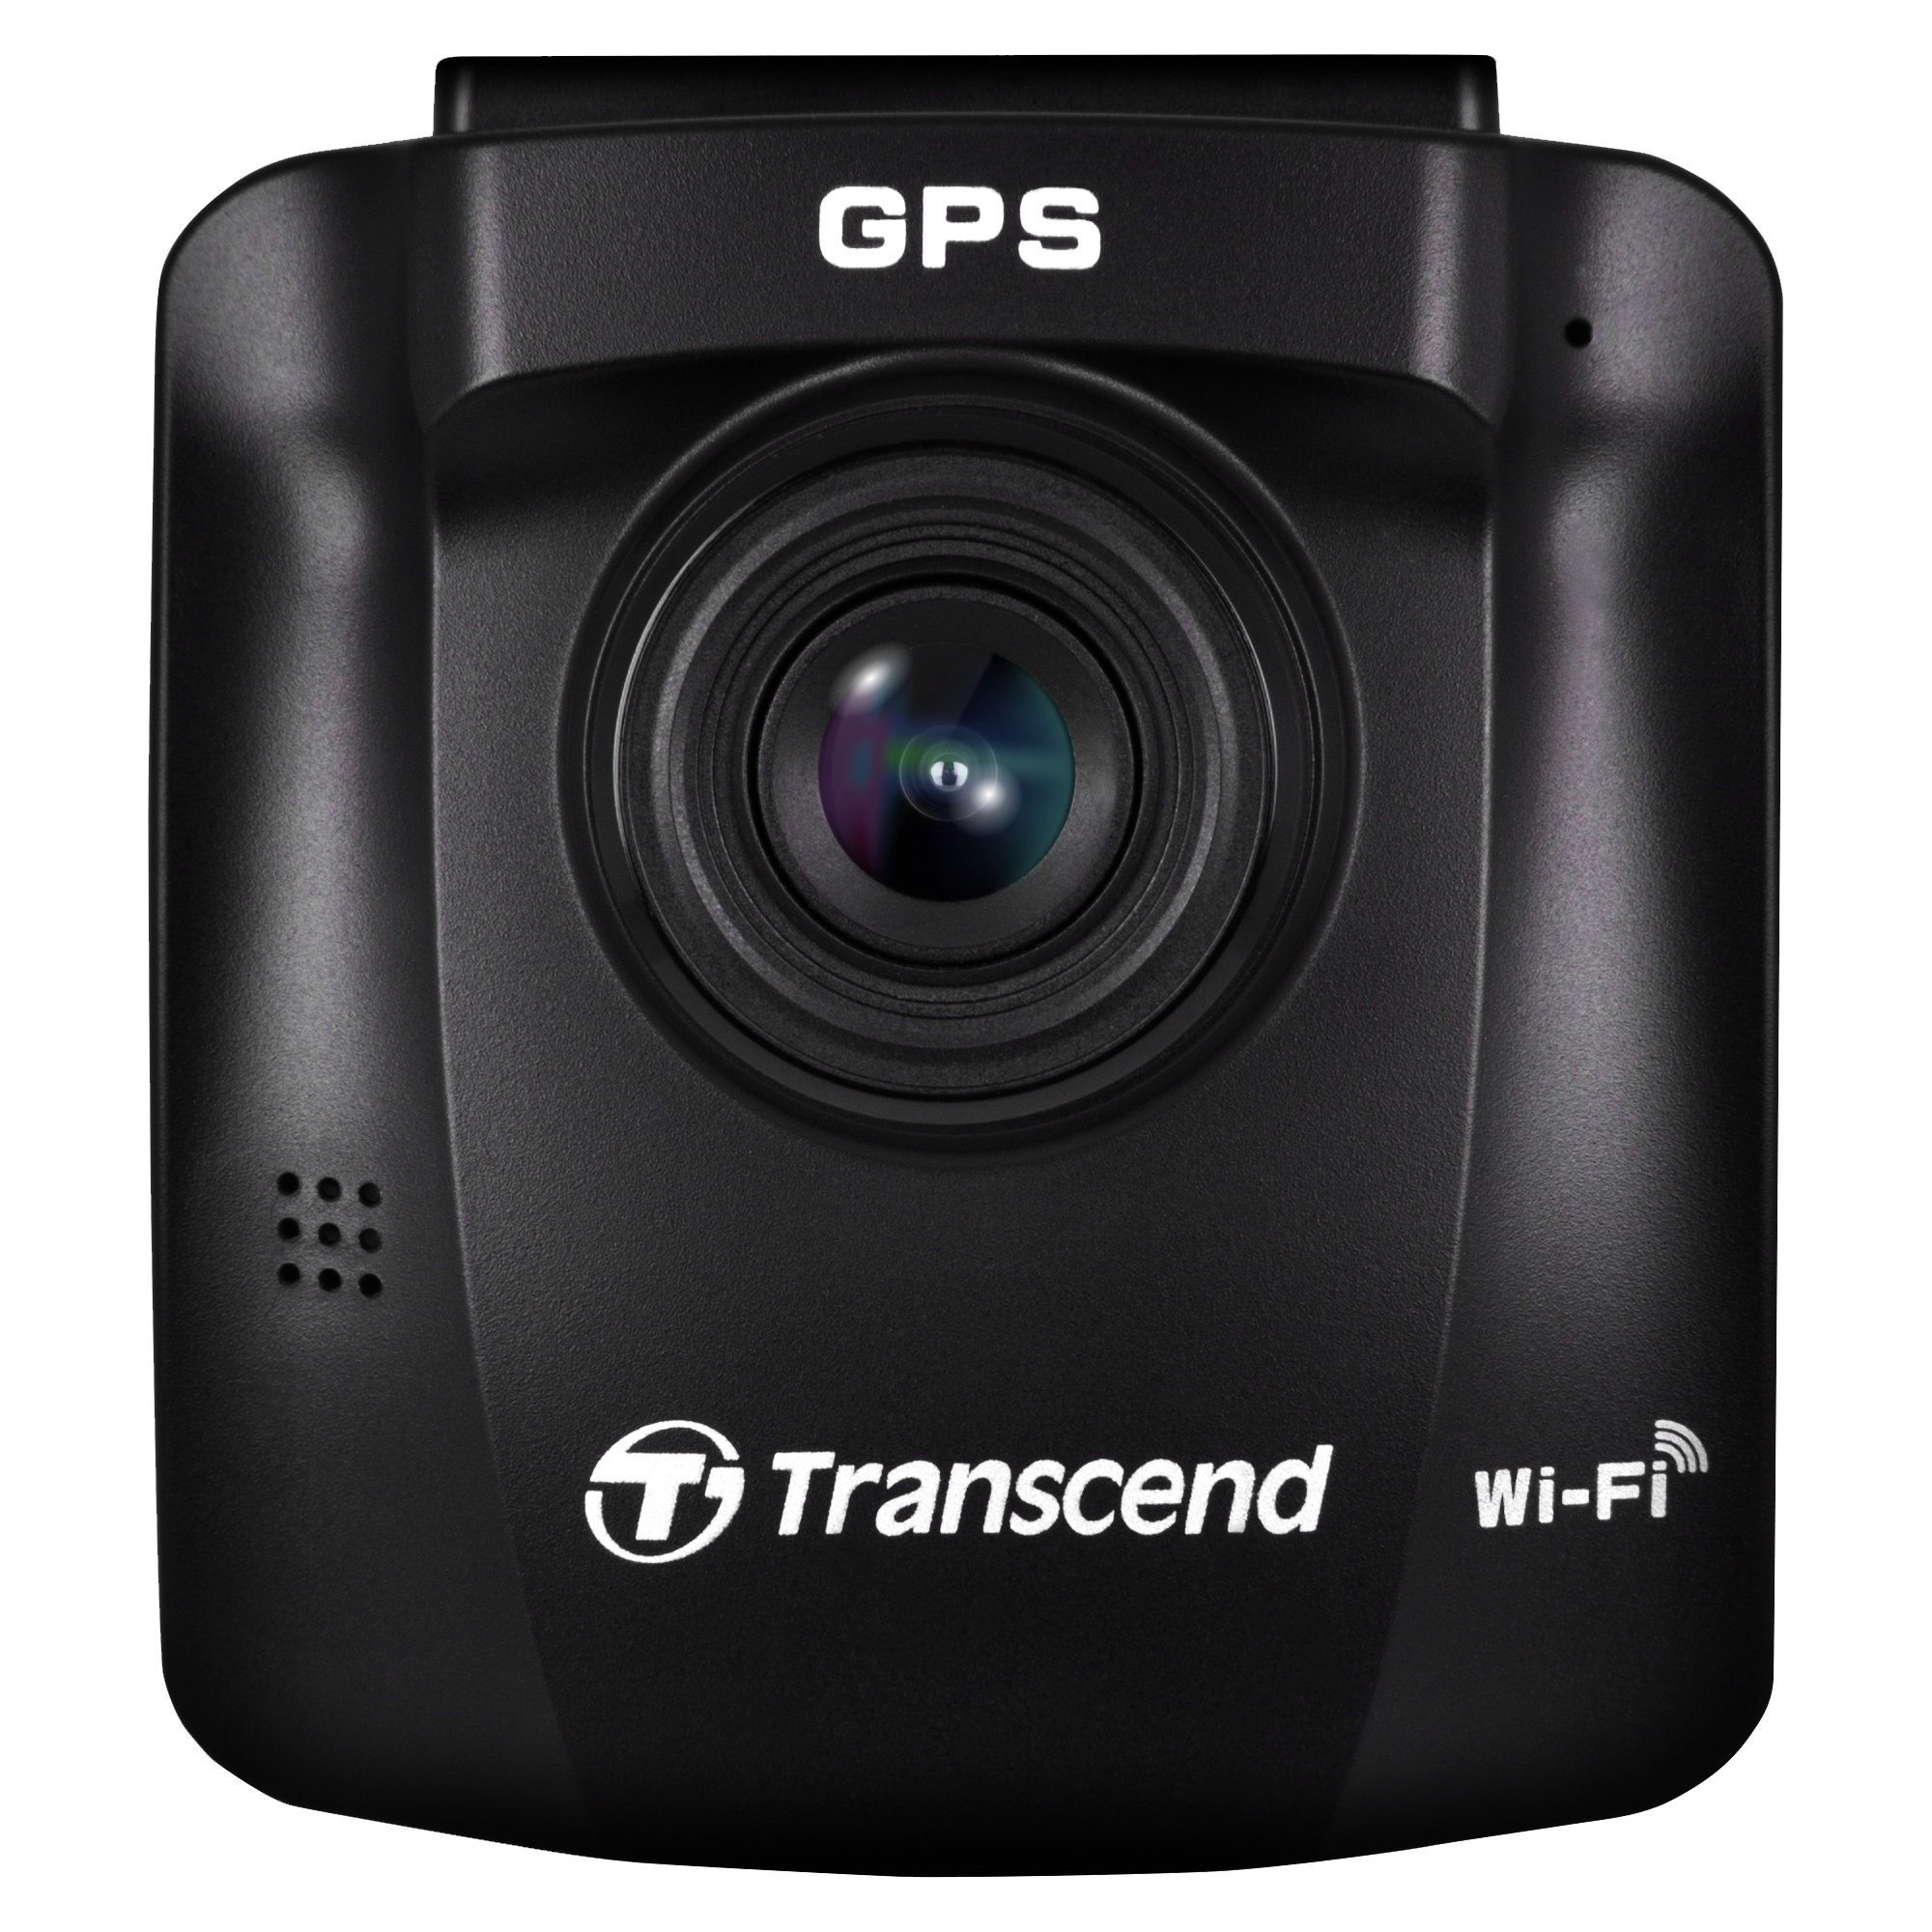
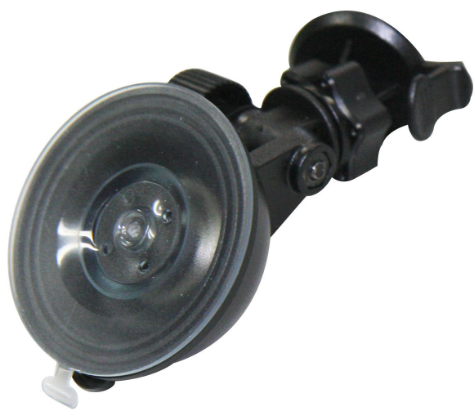
| DrivePro 250 Dashcam | Suction Mount |
|
|
|
|
microSD Memory Card |
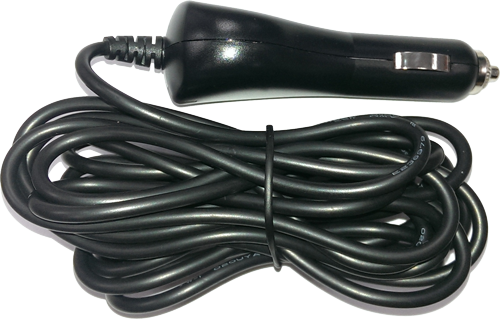
Car Lighter Adapter |
Quick Start Guide |

|
|
|
2. Getting Started
2-1 Overview
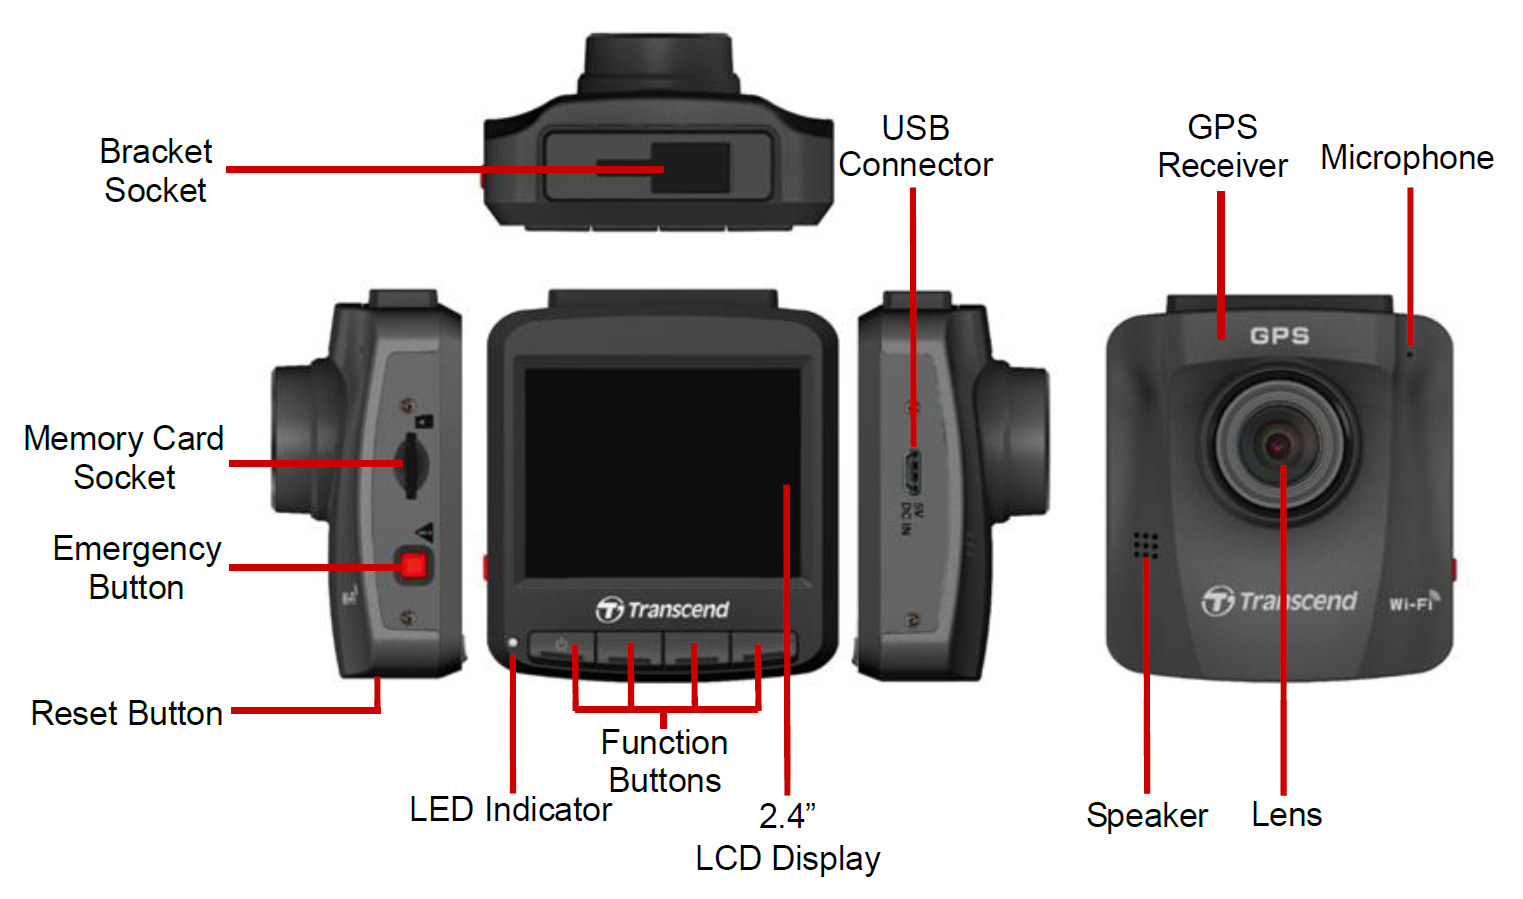
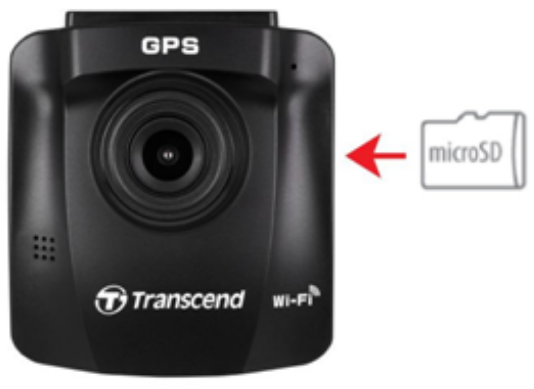
2-2 Inserting a microSD Memory Card
Before you can start recording, you need to insert a microSD memory card into the DrivePro.
1. Insert a microSD memory card into the card slot of the DrivePro.
WARNING
- Always format new memory cards through DrivePro before using them for the first time. To format a new memory card, press the
 Settings button during recording, and select Format Card.
 - Formatting will erase all data on the memory card.
- DrivePro 250 can only support the FAT32 file system, not exFAT/NTFS.
2. To remove, push to eject the memory card out of the slot.
WARNING
Do not remove the memory card during a shutdown to avoid damages to the memory card and loss of recorded videos.
- We recommend Transcend’s High Endurance microSD cards or MLC-based memory cards to ensure the best recording performance.
-
For models produced before 2023.04, please use a microSD card with 8GB, 16GB, 32GB, 64GB, or 128GB capacity (Class 10 or above).
-
For more details on the approximate recording time according to card capacity, go to FAQ on our official website.
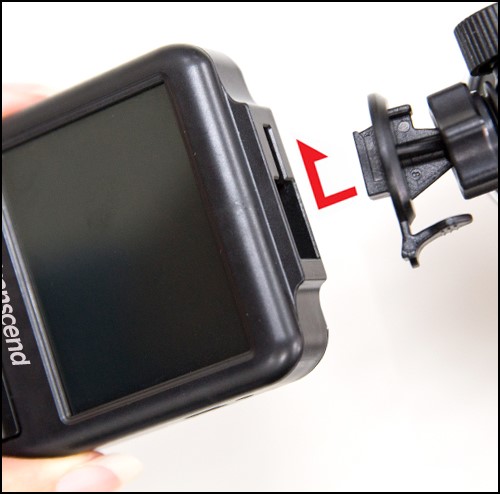
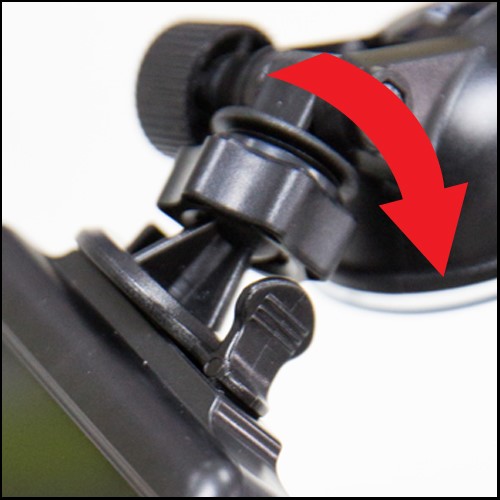
2-3 Mounting the Dashcam
-
Insert the mount bracket into the top of the dashcam, and slide sideways until you hear a click.
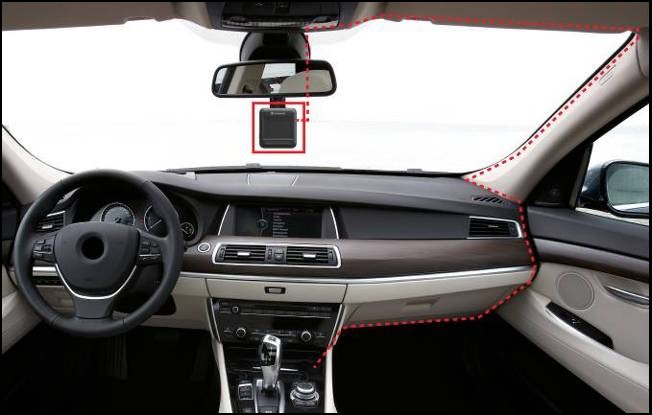
- Thoroughly clean the area of the windshield you wish to mount the dashcam. If possible, mount it in the middle of the windshield and close to the height of the rear-view mirror for the best field of view.
- Peel off the protective film from the mount bracket’s foam sticker, and firmly attach the dashcam to the windshield.
-
Turn the adjustment knob anticlockwise to loosen, and then adjust the dashcam’s position.
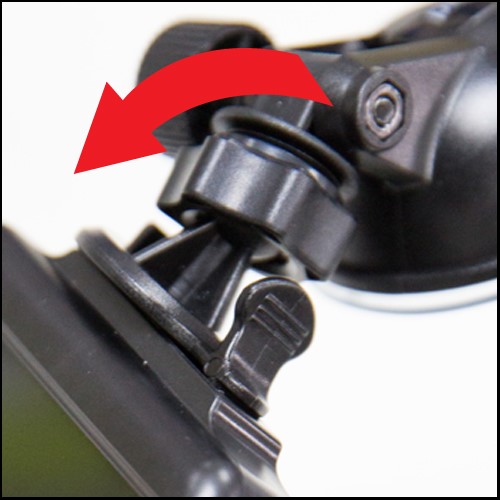
-
After the dashcam is in the best position, turn the adjustment knob clockwise to make sure that it is securely locked in place.
2-4 Connecting to Power
-
Connect one end of the car lighter adapter to the DrivePro’s micro USB port.

-
Connect the other end of the adapter to your car power outlet.
- After the car engine is switched on, the dashcam will automatically turn on and start recording.
- After the car engine is switched off, the dashcam will automatically save the current recording and power it off.
Note
- Insert a microSD memory card into the DrivePro before connecting it to your car’s power outlet.
- Car power outlets of some types of vehicles will still supply power after the car engine is turned off. If your car is of this type, please unplug your dashcam from the power outlet to avoid unnecessary power consumption and unexpected issues.
2-5 Function Buttons

- Press and hold the
 Power button for 3 seconds to manually turn on/off the DrivePro in any mode.
 - Long press the
 button to quickly turn on/off the microphone.
 - Long press the Settings button to quickly enter the Time-Lapse Video menu.
2-6 LED Indicator
| LED Status | Definition |
|---|---|
| Solid Red | Standby |
| Flashing Red | Recording |
| Flashing Blue | WiFi On and Recording |
2-7 Setting the Date and Time
Set the date and time first to ensure the recording time is right.
-
During video recording, press the Settings button.
-
Use
 /
/ to select Date/Time, and press OK.

-
Use / to adjust values, and press OK to move to the next block.
- Repeat step 3 above until the date and time settings are complete.
2-8 Setting UTC Timezone
To ensure the accuracy of GPS data, please set the UTC time after setting the date and time:
-
During video recording, press the Settings button.
-
Use / to select UTC, and press OK.
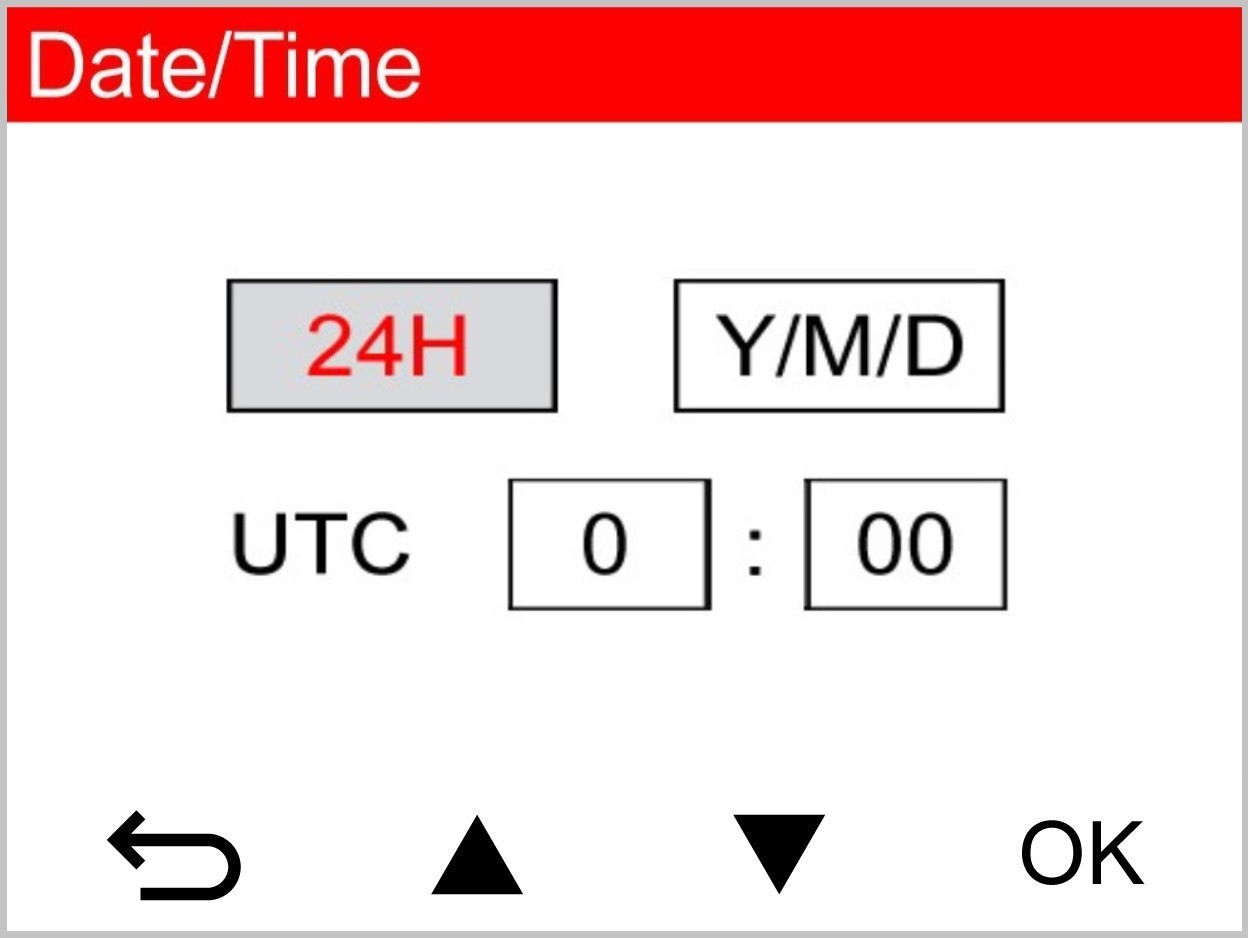
-
Use / to adjust values, and press OK.
3. Recording Videos
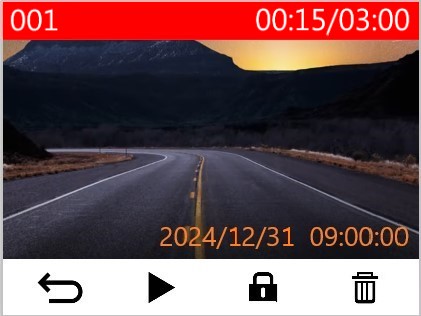
3-1 Recording Screen
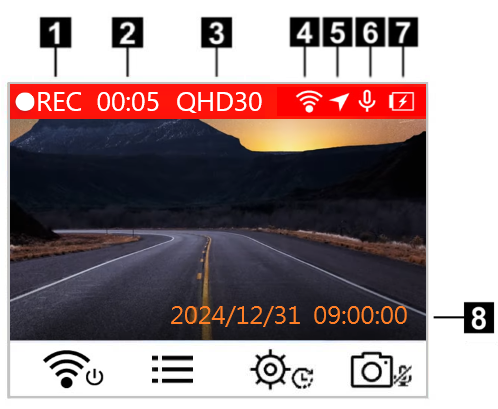 |
1. Recording status indicator 2. Video length 3. Video resolution / Frame rate 4. WiFi connection indicator 5. GPS connection indicator 6. Voice record status 7. Battery status 8. Date / Time |
After the car engine is switched on, the DrivePro will automatically turn on and start recording.
By default, one video file is saved for every minute of recording. To adjust the recording length, please go to the ![]() Settings menu.
Settings menu.
After the car engine is switched off, the DrivePro will automatically save the current recording and power it off.
3-2 Emergency Recording
30% of the storage space will be saved for emergency video files. Video files recorded in Emergency Recording mode are protected from being overwritten.
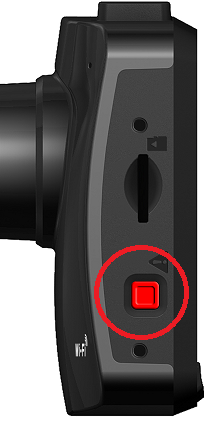
Manual Emergency Recording:
During video recording, press the emergency button on the left-hand side of the DrivePro to activate Emergency Recording mode. The emergency icon will appear on the screen when activated.
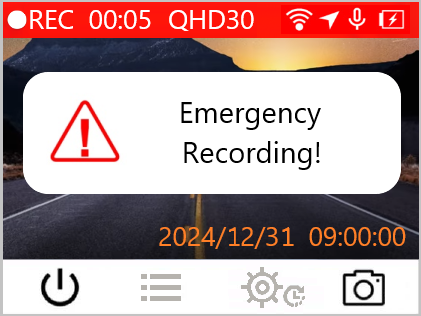
G-Sensor Emergency Recording:
During video recording, the DrivePro automatically activates Emergency Recording mode when detecting a collision or hit.
- If the G-Sensor sensitivity is set to “High,” even minor shocks activate Emergency Recording mode.
- If the G-Sensor sensitivity is set to “Low,” only significant shocks activate Emergency Recording mode.
G-Sensor sensitivity can be adjusted in the ![]() Settings menu.
Settings menu.
Note
Loop recording is enabled by default. The earliest emergency files will be overwritten by the latest emergency files recorded.
3-3 Parking Mode Recording
After the car engine is switched off, the DrivePro can automatically enter Parking mode and record footage when collision or motion is detected. Parking mode is disabled by default and can be enabled in ![]() Settings menu.
Settings menu.
Note
After switching off the car engine, enabling Parking mode may drain the DrivePro’s built-in battery.
During Parking mode, the LCD display will turn off and the LED indicator will remain solid red on standby. If the DrivePro detects a collision or motion of the vehicle, it will record footage for about 15 seconds, and the display will turn on while the LED flashes red. If no more motion is detected within approximately 15 seconds, the display will turn off again. When the engine is switched on (and the device is connected to power), the DrivePro will resume Normal Recording mode.
Transcend’s car lighter adapter does not supply power after the engine is switched off. If long-term recording in Parking mode is required, please use an external power supply. Enter the Parking mode manually by long-pressing the ![]() Power button during video recording. To power off the DrivePro, long-press the
Power button during video recording. To power off the DrivePro, long-press the ![]() Power button again.
Power button again.
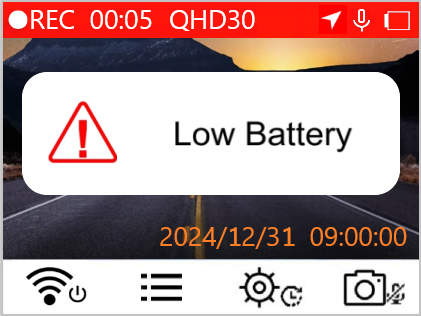
Low Battery
Please connect the DrivePro to the power supply immediately after the Low Battery warning is displayed onscreen to avoid any errors occurring with the system time. Please avoid using the built-in battery to record videos directly.
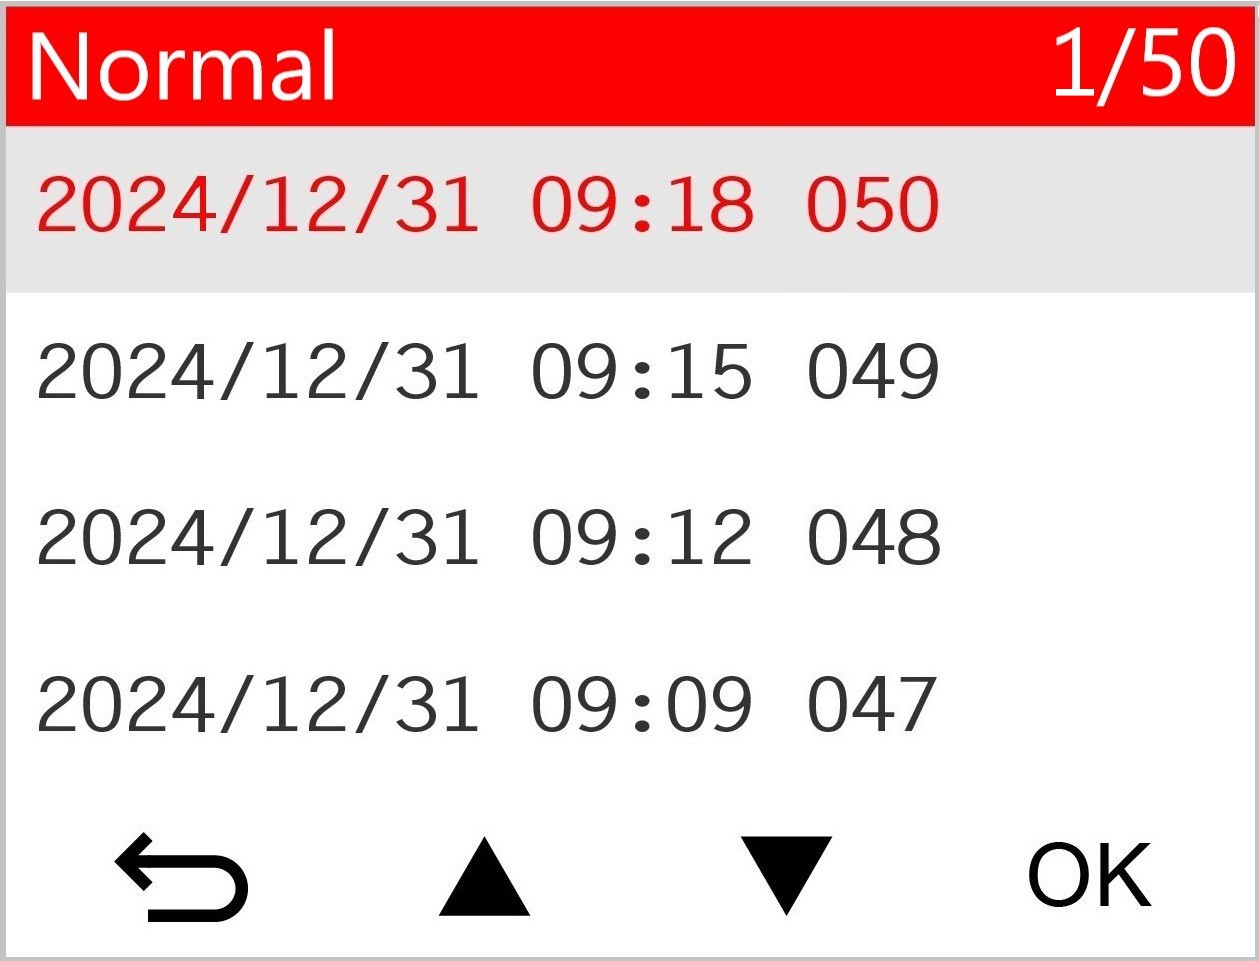
4. Browsing Photos and Playing Videos
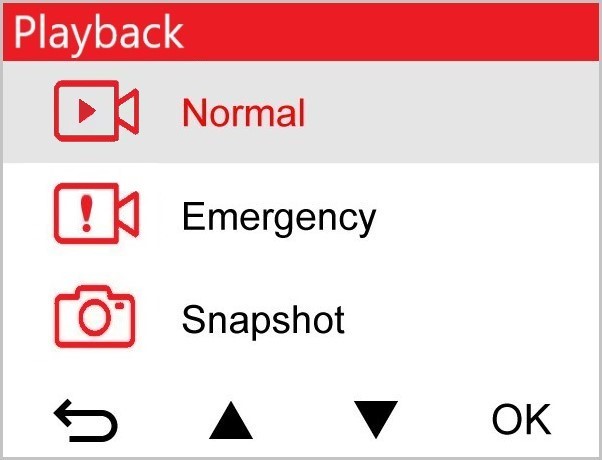
4-1 Playing Videos / Browsing Photos
-
During video recording, press the
 Browse button.
-
Use / to select either Normal, Emergency or Snapshot, and press OK.
-
Use / to select the desired video file, and press OK.
-
Press
 to pause playback. Press
  again to resume playback.
-
Press
 to return to the video file list.
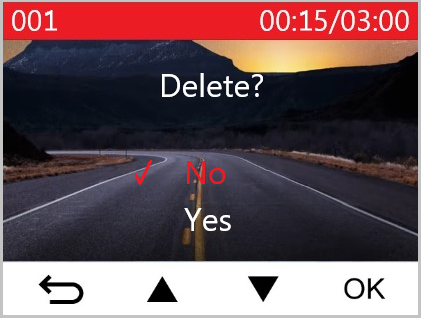
4-2 Deleting Videos
- During playback of a video file, press
 . The message “Delete?” will pop up.
 - Use / to select “Yes,” and press OK to delete the file.
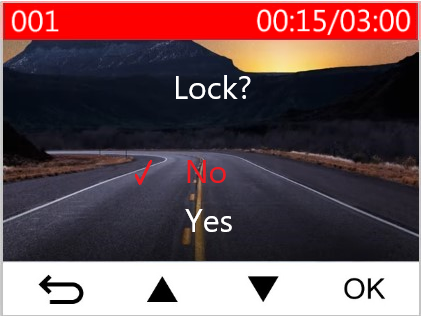
4-3 Protecting Videos
- During playback of a normal video file, press
 . The message “Lock?” will pop up.
 - Use / to select “Yes,” and press OK to protect the file.
5. Settings
In the ![]() Settings menu, you can adjust video resolution, recording time and G-Sensor sensitivity. You can also set the date/time/time zone, change the interface language, format the memory card, and upgrade firmware.
Settings menu, you can adjust video resolution, recording time and G-Sensor sensitivity. You can also set the date/time/time zone, change the interface language, format the memory card, and upgrade firmware.
-
During video recording, press the Settings button.
-
Use / to select the desired menu option, and press OK.
-
Use / to select the desired setting, and press OK.
-
Press to return to the Settings menu.
5-1 Menu Options
| Camera | ||
| Icon | Feature | Function / Option |
|
|
Resolution | Set the resolution for video recording. |
| 1440P 60fps / 1440P HDR (default) / 1080P 60fps / 1080P HDR / 720P 60fps / 720P HDR | ||
|
|
Exposure Value | Adjust the exposure value of the camera. |
| +2.0 / +1.5 / +1.0 / +0.5 / 0.0 (default) / -0.5 / -1.0 / -1.5 / -2.0 | ||
|
|
Microphone | Turn on/off the microphone during video recording. |
| Disable / Enable (default) | ||
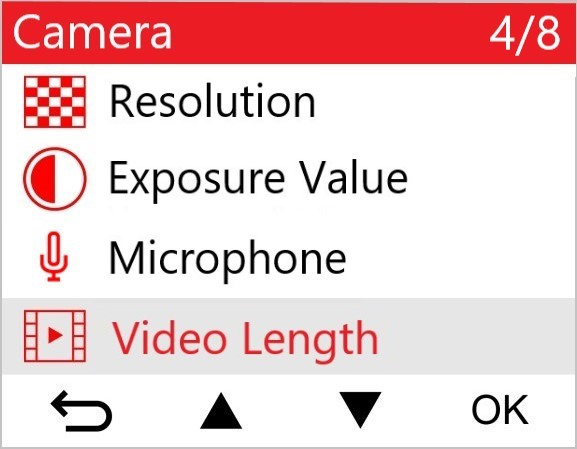
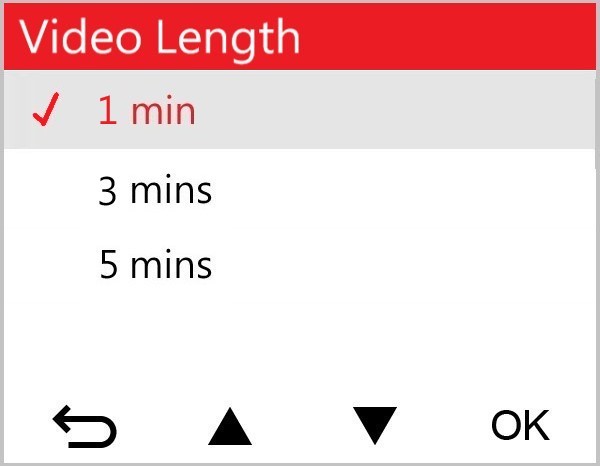
|
|
Video Length | Set the recording length of each recorded video file. |
| 1 min (default) / 3 mins / 5 mins | ||
|
|
Video Stamp | Display the current time of the event or GPS information of the recorded videos. |
| Disable / Enable (default) | ||
|
|
Loop Recording | Overwrite the earliest video files with new ones if the microSD card is full. |
| Disable / Enable (default) | ||
|
|
Light Frequency | Select the appropriate frequency to avoid flashing A/C light. |
| 50 Hz (default) / 60 Hz | ||
|
|
Time-Lapse Video | Set a preferred time interval to make time-lapse videos. Time-Lapse Video mode can only be enabled manually; once enabled, it will replace Normal Recording mode. |
| Disable (default) / 1 sec/shot / 2 sec/shot / 4 sec/shot | ||
| Driving Assistant | ||
| Icon | Feature | Function / Option |
|
|
Lane Departure |
Alert the driver when the vehicle veers out of a lane. This function is activated when the driving speed exceeds the value set ahead.
|
| Disable (default) / >60 km/h to >150 km/h (>40 mph to >95 mph) | ||
|
|
Forward Collision |
Alert the driver when the vehicle is getting too close to the car ahead. This function is activated when the driving speed exceeds the value set ahead.
|
| Disable (default) / >60 km/h to >150 km/h (>40 mph to >95 mph) | ||
|
|
Speed Alarm | Alert the driver with warning beeps if the driving speed exceeds a preset value. |
| Disable (default) / >60 km/h to >150 km/h (>40 mph to >95 mph) | ||
|
|
Speed Unit | Set the measurement unit of speed. |
| km/h (default) / mph | ||
|
|
Head-Up Display | Display the current speed and safety alerts onscreen. |
| Disable (default) / Enable | ||
|
|
Headlight Reminder | When the DrivePro detects poor lighting conditions, the headlight reminder will automatically activate. |
| Disable (default) / Enable | ||
|
|
Driver Fatigue Alert | Remind the driver of the need to rest after driving for a preset, driver-determined period. |
| Disable (default) / 1 hour / 2 hours / 3 hours / 4 hours | ||
|
|
Parking Mode | When the car engine is turned off, the dashcam will continue to detect motion and image changes to determine whether to continue recording. (This mode will drain the built-in battery.) |
| Disable (default) / Enable | ||
| System | ||
| Icon | Feature | Function / Option |
|
|
Volume | Set the speaker volume level. |
| 0 to 7 (Choose 0 to switch on Silent Mode) | ||
|
|
G-Sensor | Adjust the sensitivity of the G-Sensor. |
| Disable / Low (default) / Medium / High | ||
|
|
Delay Power Off | Schedule the DrivePro to shut down at a certain time. |
| Disable / 10 secs (default) / 30 secs | ||
|
|
Auto Display Off |
Set duration for the display to automatically turn off after the recording begins.
|
| Never (default) / After 1 min / After 3 mins | ||
|
|
GPS Status | Display the number of GPS satellites received and GPS signal intensity. |
|
|
WiFi | Turn off/on WiFi. |
| Off / On (default) | ||
|
|
Date / Time | Set the date, time, format and time zone. |
|
|
Language | Set the on-screen display menu language |
| English / 繁體中文 / 简体中文 / 日本語 / Deutsch / Español / Français / Italiano / Русский / Português / Ελληνικά / Türkçe / 한국어 / ไทย / Polski | ||
|
|
Format Card |
Format the microSD memory card.
|
| Cancel (default) / Confirm | ||
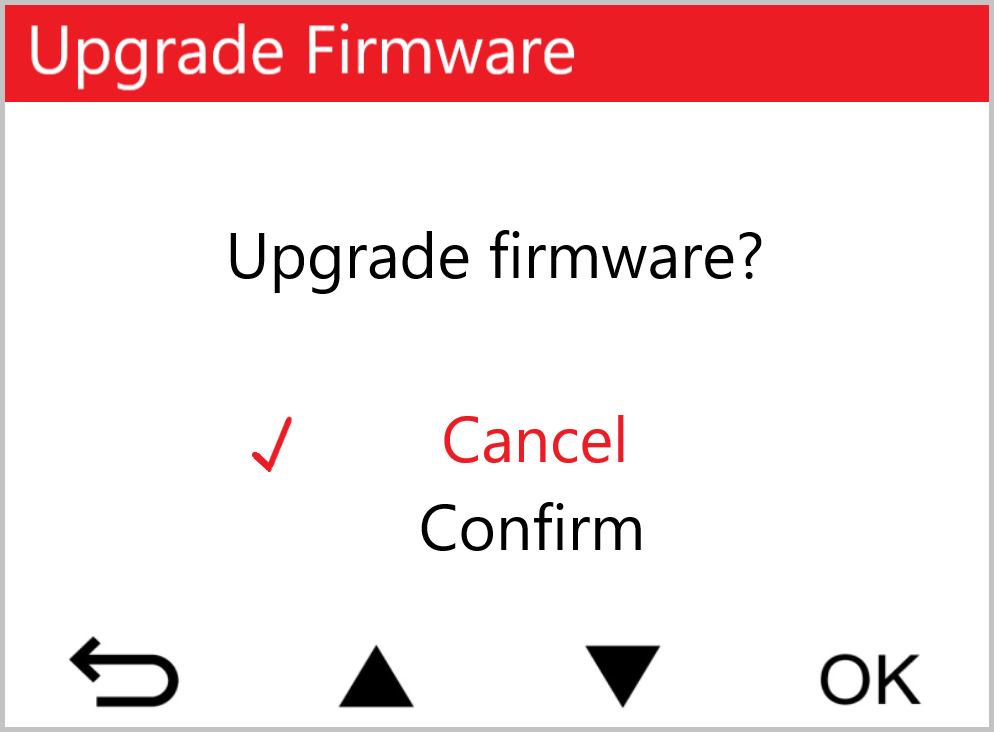
|
|
Upgrade Firmware | Keep your DrivePro up-to-date with the latest firmware version. Download from Transcend website: https://www.transcend-info.com/Support/service |
| Cancel (default) / Confirm | ||
|
|
Restore Defaults | Reset all settings to their factory defaults. |
| Cancel (default) / Confirm | ||

|
Screen Adjustment | Adjust the position of the recording screen. |
|
|
Information | Display the DrivePro’s current firmware version, card capacity, WiFi SSID, password, and model name/number. |
5-2 Firmware Upgrade
-
After downloading the firmware from Transcend website, decompress it and put the file in the “SYSTEM” folder of the microSD memory card.
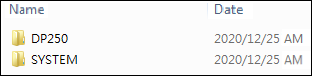
- Insert the microSD memory card that contains the latest firmware version into the card slot of the DrivePro.
-
Connect the DrivePro to an external power outlet. Select Upgrade Firmware from the Settings menu, and press OK to start the firmware detection process. The DrivePro will automatically find the latest firmware file. Select Confirm to complete the firmware upgrade process.
Note
The firmware upgrade will take about 1 to 2 minutes. Please do not turn off the DrivePro while upgrading. The DrivePro will restart automatically after the upgrade is complete.
WARNING
NEVER remove the power cord or the microSD memory card while the firmware is being upgraded.
If the DrivePro cannot be turned on due to firmware upgrade failure, please contact Transcend customer service for technical support.
6. Using the DrivePro App
Developed specifically for iOS (iPhone/iPad) and Android devices, the free downloaded DrivePro App allows you to wirelessly watch live-view video footage during recording, control DrivePro functions, and play videos directly on your smartphone or tablet.

DrivePro App
6-1 Downloading and Installing the DrivePro App
-
Search “DrivePro” on App Store or Google Play.
-
Download and install the DrivePro App.
Once the installation is complete, the App will be displayed on your device's home screen.
Before using the App, please refer to the DrivePro App instructions.
6-2 Connecting to the DrivePro
1. Please connect your mobile device to the DrivePro using one of the following methods:
- Option 1: Scan the WiFi QR code on the dashcam.
- Press the Power button on the DrivePro.
- Scan the QR code on the DrivePro's screen using your mobile device.
- Press the

Note
This feature is only applicable to firmware v3.2 and later.
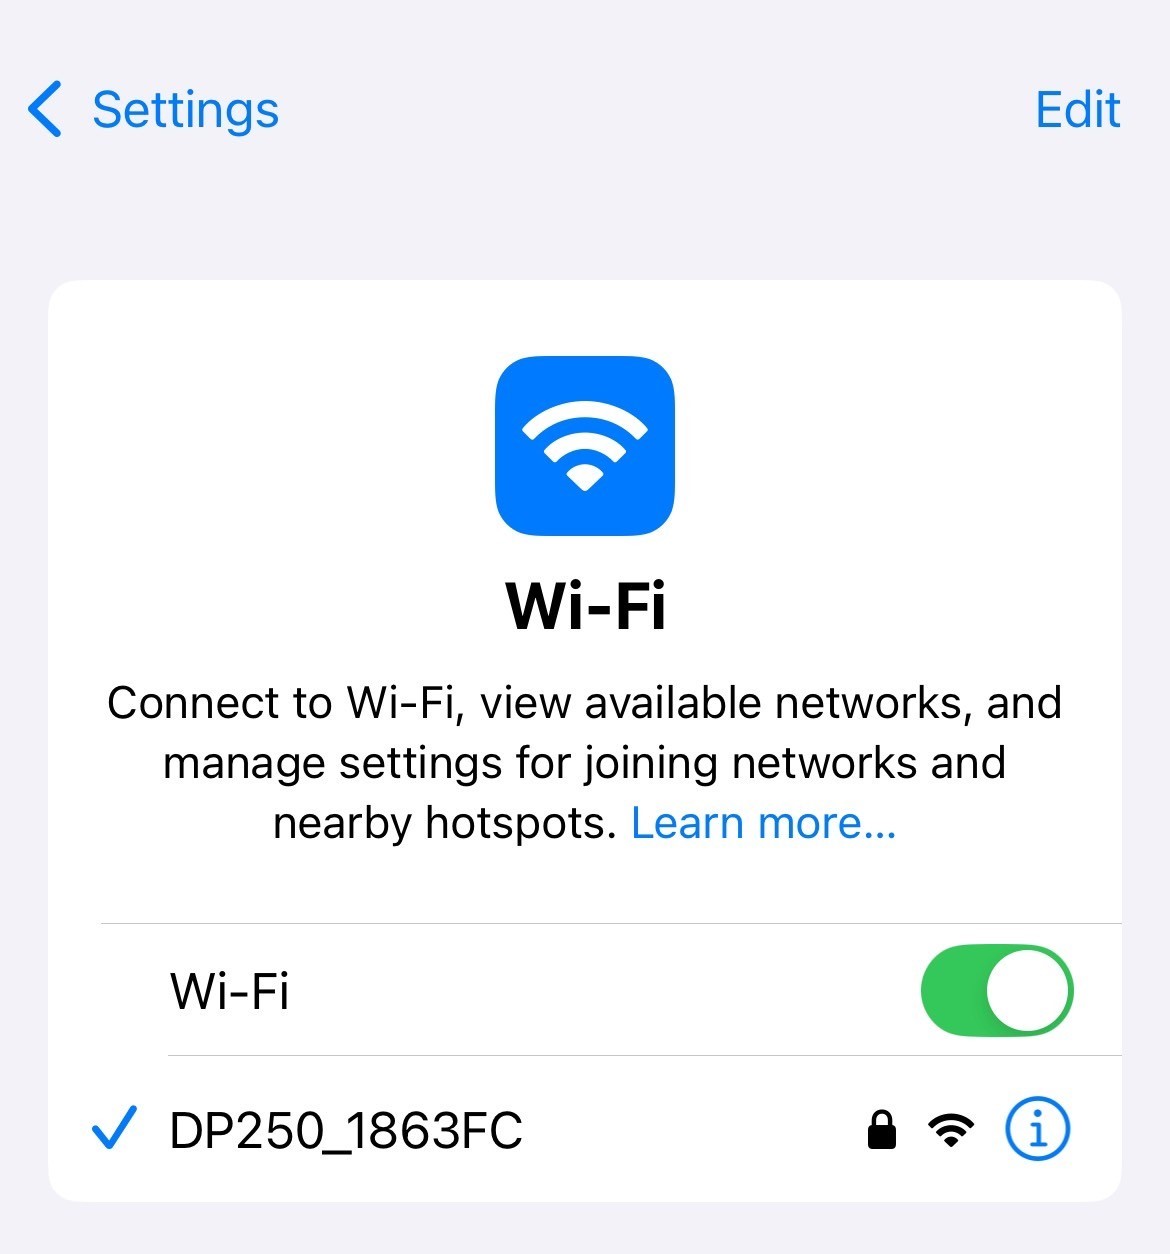
- Option 2: Select the WiFi signal.
- Tap Settings > WiFi on your mobile device.
- Select the WiFi network with DP250 in the SSID. (The default password is 12345678)
2. Tap the DrivePro App icon on your mobile device and connect to the DrivePro 250.
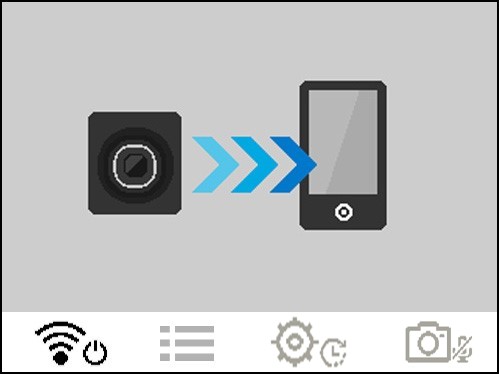
3. The image above will be displayed when you are connecting to the DrivePro.
Note
- We recommend changing the DrivePro's WiFi password the first time you connect to the app.
- To change the default SSID password, go to Settings in the DrivePro App.
4. Visit the DrivePro FAQ for detailed operation guidance.
7. DrivePro Toolbox Software
The DrivePro Toolbox, developed for Windows and macOS, features a user-friendly interface that allows you to select and play videos recorded on your DrivePro, and see your driving paths of the recorded videos displayed on maps without the need to install separate codecs.
System requirements for connecting the DrivePro to a computer:
- A desktop or a laptop with a working USB port
- Microsoft Windows 10 or later
- macOS 10.12 or later
-
Download the installation files:
https://www.transcend-info.com/support/software/drivepro-toolbox -
Install DrivePro Toolbox software on your computer.
| Main Features | |
|
Video Sorting |
Sort videos by filename, recording date, or group, which allows users to search for recorded videos efficiently and to play them. |
|
Smooth Video Playback |
Connect the DrivePro or use a microSD card reader or adapter to play back recorded video events on your computer. |
|
Edit and Trim Videos |
Select a video, trim it and save it as a new clip immediately. You can also capture snapshots from your videos during playback. |
|
Map View |
View the driving paths of your journey displayed on maps along with the recorded video.
|
|
License Plate Recognition |
Automatically identify the license plates in a video and extract footage to allow users to perform a quick search.
|
|
Export Merged Videos |
Play videos recorded by the front and rear lens/camera simultaneously. Export and play merged videos.
|
8. Transferring Files to a Computer
Take the microSD memory card out of the dashcam, and insert it into a compatible card reader to transfer files to your computer.
Note
After manually deleting files from your memory card in macOS, these files may temporarily exist as hidden files in the Trash, taking up space. Please empty the Trash or format the memory card to completely free the space.
9. Troubleshooting
If a problem occurs with your DrivePro, please check the instructions below before sending your DrivePro for repair. If you cannot find an ideal solution to your question below, please consult the store where you purchased the product or the service center, or contact the local Transcend branch office. You can also visit the Transcend website for FAQ and Technical Support services. For any hardware issues, please refer to the DrivePro User’s Manual.
- None of the DrivePro buttons are responding. (The dashcam crashes or runs with lag.)
- Try unplugging the car adapter from your DrivePro, and reconnecting it.
- My DrivePro cannot play videos stored in my memory card.
- Edited videos may not be displayed on your DrivePro.
- Nothing happens when I press the “Emergency button.”
- Emergency Recording works in the Recording mode only.
10. Safety Cautions
These usage and safety guidelines are IMPORTANT! Please follow them carefully to ensure your safety and help protect your DrivePro from potential damages.
- General Use
- For in-car use only.
- For your safety, do not operate the DrivePro or use the DrivePro App while driving.
- Avoid placing the DrivePro in an extreme temperature environment.
- Avoid splashing water or any other liquids on the DrivePro and accessories.
- Do not use the DrivePro in an environment with strong magnetic fields or excessive vibration.
- Only use the car adapter provided by Transcend. Other car adapters may not be compatible with the DrivePro.
- Some vehicles have power outlets that remain active even when the engine is turned off. If your car is of this type, please unplug your dashcam from the car power outlet to avoid unnecessary power consumption and unexpected issues.
- The GPS is subject to changes that could affect its performance. Transcend does not guarantee the accuracy of GPS data, which should not influence your judgment while driving.
- GPS signals cannot penetrate buildings and metallic tinted films. The accuracy of GPS data depends on the surroundings including the weather and the location it is being used (e.g., high buildings, tunnels, undergrounds and forests).
- Mounting Location
- Never place the DrivePro where the driver’s view or deployment of airbags is obstructed.
- Mount the DrivePro within the range of the windshield wipers to ensure clear visibility in rain.
 WARNING: Remove the DrivePro carefully if it is mounted on a tinted window to prevent damages to the tint film.
- Backing up Data
- Transcend does NOT take any responsibility for data loss or damage during operation. We strongly advise that you regularly back up data in the memory card for your dashcam to a computer or other storage medium.
WARNING
Rechargeable batteries may leak under extreme conditions. Misuse or abuse can lead to the following hazards:
- Overheating
- Fire
- Explosion
- Smoke emission
11. Specifications
| DrivePro 250 | ||
|---|---|---|
| Models produced before 2023/04 | Models produced after 2023/04 | |
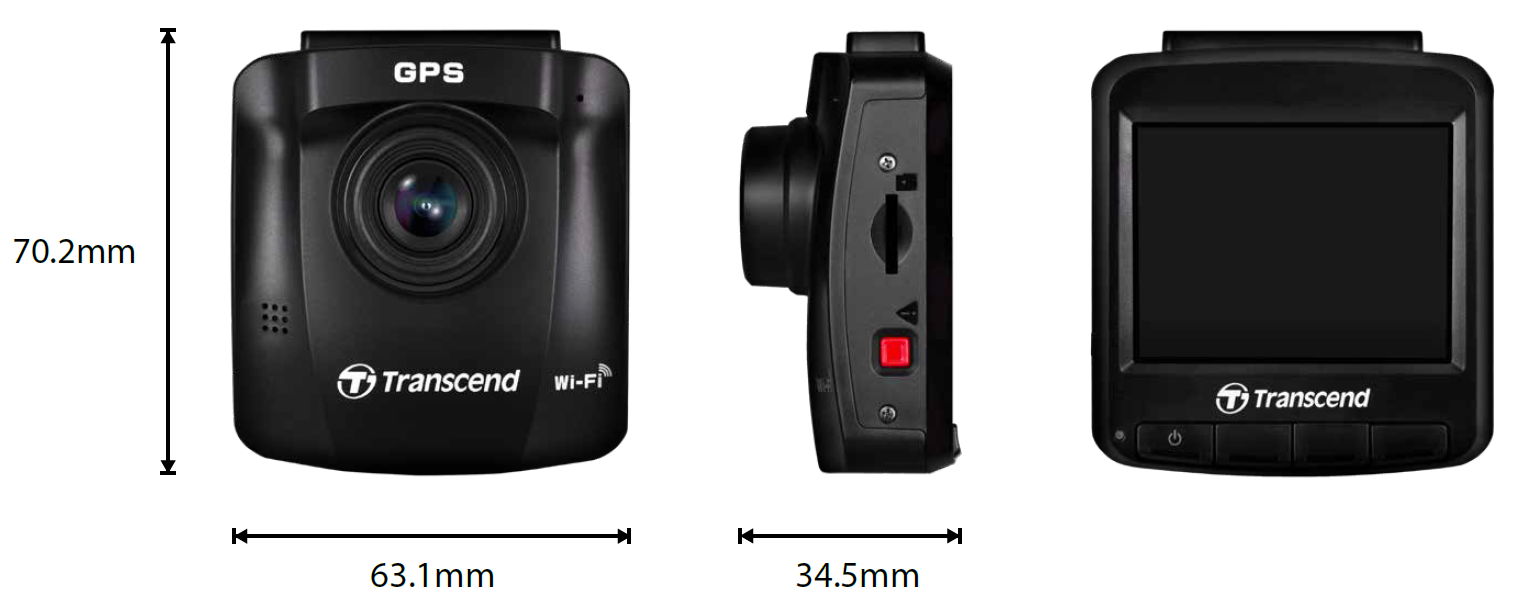
| Dimensions | 70.2 mm (L) × 63.1 mm (W) × 34.5 mm (H) | |
| Weight | 78 g | 82 g |
| Connection Interface | USB 2.0 | |
| Memory Card Supported | microSD 8 GB / 16 GB / 32 GB / 64 GB / 128 GB (Class 10 or above) |
Check product specifications on our official website |
| WiFi Protocol | 802.11n | |
| Frequency | 2.4 GHz | |
| Panel | 2.4" color LCD | |
| Lens | F/2.0, 140° wide angle | |
| Video Format | H.264 (MP4: up to 1920×1080P 60FPS) |
H.264 (MP4: up to 2560×1440P 60FPS) |
| Resolution / Frame Rate |
Full HD 1920×1080P 60/30FPS HD 1280×720P 60/30FPS |
2K QHD 2560×1440P 60/30FPS Full HD 1920×1080P 60/30FPS HD 1280×720P 60/30FPS |
| Operating Temperature | -20°C (-4°F) to 65°C (149°F) | |
| Power Supply (car charger) |
Input DC 12 V to 24 V Output DC 5 V / 1 A |
Input DC 12 V to 24 V Output DC 5 V / 2 A |
| Power Supply (dashcam) |
Input DC 5 V / 2 A | |
| Global Navigation Satellite System | GPS / GLONASS | |
| Certification | BSMI / CE / EAC / FCC / KC / MIC / NCC / RCM |
CE / UKCA / FCC / BSMI / NCC / MIC / KC / EAC / RCM |
| Warranty | 2 years | |
| Note | In addition to the bundled microSD card, we recommend Transcend’s High Endurance microSD cards or MLC-based memory cards to ensure the best recording performance. | |
12. EU Compliance Statement
Transcend Information hereby declares that all CE marked Transcend products incorporating radio equipment functionality are in compliance with Directive 2014/53/EU.
The full text of the EU declaration of conformity is available at the following internet address:
https://www.transcend-info.com/eu_compliance

| Dashcam / Body Camera series | ||
| Frequency: 2400 MHz to 2483.5 MHz |
Maximum transmit power: < 100 mW |
|
13. Recycling and Environmental Protection
For more information on recycling the product (WEEE) and battery disposal, please refer to the following link:
https://www.transcend-info.com/about/green
14. Federal Communications Commission (FCC) Statement
This device complies with Part 15 FCC Rules. Operation is subject to the following two conditions: (1) This device may not cause harmful interference. (2) This device must accept any interference received including interference that may cause undesired operation.
This Equipment has been tested and found to comply with the limits for a Class B digital device, pursuant to Part 15 of the FCC rules. These limits are designed to provide reasonable protection against harmful interference in a residential installation. This equipment generates, uses and can radiate radio frequency energy and, if not installed and used in accordance with the instructions, may cause harmful interference to radio communications. However, there is no guarantee that interference will not occur in a particular installation. If this equipment does cause harmful interference to radio or television reception, which can be determined by turning the equipment off and on, the user is encouraged to try to correct the interference by one or more of the following measures:
- Reorient or relocate the receiving antenna.
- Increase the separation between the equipment and receiver.
- Connect the equipment into an outlet on a circuit different from that to which the receiver is connected.
- Consult the dealer or an experienced radio/TV technician for help.
RF Exposure Information (SAR)
This equipment complies with the FCC portable RF exposure limit set forth for an uncontrolled environment. The exposure standard for wireless devices employing a unit of measurement is known as the Specific Absorption Rate, or SAR. The SAR limit set by the FCC is 1.6W/kg.
This equipment could be installed and operated with minimum distance 0cm between the radiator & your body.
-
Any changes or modifications not expressly approved by the party responsible for compliance could void the authority to operate equipment.
-
This device and its antenna must not be co-located or operating in conjunction with any other antenna or transmitter.
Transcend Information Inc (USA)
1645 North Brian Street, Orange, CA 92867, U.S.A
TEL: +1-714-921-2000
15. Warranty Policy
Please find the warranty period of this product on its package. For details of Warranty Terms and Conditions and Warranty Periods, please refer to the link below:
https://www.transcend-info.com/warranty
16. GNU General Public License (GPL) Disclosure
For more information on open-source licensing, please refer to the link below:
https://www.transcend-info.com/Legal/?no=10
17. End-User License Agreement (EULA)
For details of software license terms, please refer to the following link:
https://www.transcend-info.com/legal/gpl-disclosure-eula
18. Eurasian Conformity Mark (EAC)